Showing posts with label Breakfast. Show all posts

Monday, July 22, 2013

Egg Foo Young


One of our kids' favorite comfort foods is egg foo young. They love to get a big bowl of steamed rice, a couple patties of egg foo young and drip a little soy sauce over the whole thing and eat to their tummy's content. Egg foo young is SO simple to make at home, you don't have to wait until you go to your fave Chinese restaurant to have it...just whip up a batch at home! The only thing you'll need that you may need to get from an Asian market (unless your local supermarket has an ethnic food section) is Squid brand fish sauce. Of course you can use another brand if you want, but Squid is the best, trust me! It sounds weird but once it's in the food you won't notice it overly much and it's not fishy, it's salty. It's a necessity to Asian cooking! Here's what it looks like so you can find it in your store:


Our "usual" egg foo young recipe is simple--eggs, ground pork and green onions. But this is basically an Asian omelet and you can add any type of veggie you normally like in omelets. We also love to add chopped zucchini and minced garlic to ours. Vidalia onion, green pepper, mushrooms and broccoli are also great additions to this dish!

Makes 8 Servings

12 eggs
1 lb. ground pork
1 small bunch green onions, chopped
1/2 cup Squid fish sauce
corn oil

Directions:

Heat oil in a skillet on medium-high heat. Whisk eggs, pork, scallions and fish sauce together until well combined. Pour enough of the egg mixture into the skilled to cover the bottom, about a cup to two cups, depending how thick you want your egg patties to be. Swirl skillet until fully covered with egg. Cook until lightly browned on the bottom and flip. Again, cook until lightly browned on the bottom. About 3-5 minutes per side. Remove to a paper towel lined dish to absorb the oil. Continue cooking until all the egg mixture has been used. Serve over steamed rice with soy sauce, if desired.


Hubs made this for dinner last night, it was a Sunday evening and we usually eat a big meal on Sunday afternoons after church, so Sunday evenings are usually "fend for yourself" days. He was craving this dish and the kids have been wanting it since they went to visit their grandma last week and had McD's nuggets instead of this dish, which they were expecting LOL. Silly kids, disappointed over McD's nuggets...I remember back in my day, we NEVER ate out, so McD's nuggets were a special treat and we'd never have been disappointed over that! Makes me happy to know they get more excited over home-cookin' than restaurant food though, I must say! So we scarfed this down last night and then ate the leftovers this morning for breakfast. Delish! Well, we are off to enjoy a couple days at Disney this week since we are running out of summer days...I'll be back in a few days with a new recipe to share! Have a great week!

Tuesday, July 16, 2013

Sausage, Biscuits & Gravy


Here it is. The mother lode of all blog posts. The recipe for sausage gravy. Oh my, yes. Why so special, you ask? Well, to me it's the mother lode of all breakfasts because this is my absolute favorite breakfast of all time in the history of ever. I could eat this every single day. Of course, that would be quite detrimental to my health, but I'd sure be happy while doing it! My mom makes amazing, delicious biscuits and gravy. I grew up with this obsession with the dish because of her finesse at making it. However, being that I no longer live with my mother, getting to enjoy any of her biscuits and gravy is a very, very rare treat, sadly. Very sadly.

But, my hubs knows how much I love the stuff and took pity on my soul. So a few years ago, for Mother's Day, he decided to teach himself how to make it. And teach himself he did! He is now a true champion biscuits and gravy maker. (Of course I knew/know how to make it also, but it's just not the same as when someone prepares it for you with love because they know how much you adore it...besides, if I'm being honest here, I would have to admit that my hubs' biscuits and sausage gravy have far surpassed any of the ones I've ever made. I admit it!! I'm a southerner down to the bone, born in Georgia, raised in Florida...and my LA-born, Asian, grew-up-on-Vietnames-and-Chinese-food hubs...has well and truly beaten me. And I'm perfectly ok with that, in fact I'm great with it! He really is the best. I'm a lucky girl.) 
On with the show!

Makes 8 Servings

1 lb roll of sausage
1/4-1/2 cup flour
1 stick butter
3-4 cups milk
2 teaspoons black pepper
Salt, if needed

Directions:

Brown sausage in a hot skillet, stirring constantly, until all browned and crumbled. Place the stick of butter in with the sausage and stir until melted. Sprinkle 1/4 cup of flour over the sausage/butter combination and stir well, cooking and stirring for 5 minutes. Slowly pour in 3 cups of milk, a little at a time, whisking briskly with a wire whisk to ensure no lumps. If it looks too thick, stir in the extra cup of milk. If it looks too thin, sift in more flour, 1/4 cup at a time. Cook and stir for another 10 minutes or so, until gravy is thickened and bubbling. Stir in pepper, taste and add salt a pinch at a time if needed until you reach desired flavor. Serve over hot split biscuits topped with a sausage patty.


Ok, now I really need some biscuits and gravy. Problem is, the hubs is at work! Whatever shall I do?! So this recipe is just for the gravy, but we serve ours along with sausage patties--usually we have another pound roll of Jimmy Dean or Tennessee Pride breakfast sausage on hand that we slice into half-inch slices and brown over low heat with a little water to keep them from becoming dried out until they're nicely browned on the outside and no longer pink on the inside--split one open to find out. Usually takes about 10 minutes, so we let the gravy sit on the warming burner to stay nice and warm. If you don't have a warming burner, you can let it sit in the oven or on simmer, just be sure to stir every few minutes to avoid sticking to the bottom of the pan. 

As for the biscuits, it's personal preference. I must admit that even I use frozen biscuit dough (GASP!!) every once in awhile when I don't want to take the time to make homemade. Or we use one of our other two go-to biscuit recipes. One is my mom's Light and Tasty Biscuits which I absolutely adore of course, having grown up on those. And my other favorite is Brown-Eyed Baker's Buttermilk Biscuits. It just depends which type you prefer. My mom's recipe uses shortening. BEB's recipe uses butter and also she gives directions for making hers in the food processor for no-fail, perfect dough, every time. The food processor is SO easy, so often times that's been my go-to for biscuits. 

If you choose to make my mom's biscuits (or any biscuit recipe, really...), which are super tasty and moist and fluffy, here are some tips to ensure success! 


  • Make sure you use always fresh baking powder--it can go "stale" and become less potent, resulting in flatter biscuits. 


  • Don't overmix, this will give you tough biscuits, not the light and fluffy ones we're after--absolutely handle the dough as little as possible. It's touchy, it doesn't like to be messed with too much. :) 


  • Thirdly, always let the oven completely preheat to 475. The key to tall, perfectly risen biscuits is a super hot oven. The steam in the dough is what causes the biscuits to rise. 


  • And the last tip I have for perfect biscuits is, don't roll the dough too thin! Barely press it into shape with your hands or a rolling pin, but keep it no less than 3/4" thick, I sometimes do a whole inch thick. 


So now that you're overwhelmed with information :) why don't you give it a try? Bake up some biscuits, whip up some sausage gravy and indulge in my absolute favorite breakfast recipe in the history of the universe. :) I know, it will probably require extra time on the treadmill or at Zumba. But it's worth it, I promise. Have an awesome day!!

Monday, June 17, 2013

Rewind: Crockpot Breakfast Casserole


     Yesterday being Father's Day as well as a church day for us, I decided to again put my Crockpot Breakfast Casserole in the crockpot Saturday night so that when we all woke up, my hubs would have a yummy, hearty breakfast ready to be served up and eaten right away. (How do you like that dinosaur party plate? My son turned 4 last week and he insisted I use one of his plates for this photo...I couldn't resist that sweet face and how nicely he asked!) I've made it a handful of times since then, but it's been 6 years since my original post, so I thought it was time for a reminder of how awesome this casserole is! My boys like theirs with ketchup; me, I just like it plain as is. I changed a couple minor things, which I'll share with you today, and out of my whole 6 quart crockpot, we've only got maybe a serving left of it. 


Makes 6-8 Servings

1 lb. ground pork sausage, browned
1 20oz. package refrigerated shredded hashbrowns
1 1/2 cup shredded sharp cheddar cheese
1 cup shredded Monterey Jack cheese
1 8oz package cream cheese
12 eggs
1 cup half & half (or milk, if you prefer)
2 teaspoons kosher salt
1 teaspoon pepper
1/2 teaspoon ground mustard

Directions:

Place hashbrowns in the bottom of a greased crockpot. Sprinkle sausage evenly over hashbrowns. Slice cream cheese into about 1/4" thin slices and lay evenly on top of sausage layer, covering the layer as well as you can. Sprinkle 1 cup of cheddar and 1 cup of Monterey Jack cheeses over the cream cheese.  Whisk together the eggs, half and half, salt, pepper and ground mustard and pour over the cheese. Cover and cook on low 4 to 4 1/2 hours until set. *If your crockpot runs extra hot, like mine does, you can cook this on the "Keep Warm" setting overnight.*


     7 years ago when I first posted this recipe, I had an older crockpot...loved that thing, may she rest in peace...the crock dish broke and I couldn't find a replacement for it, so I bought a new, digital crockpot. I kinda hate it. It cooks SUPER hot, way hotter than my older one, apparently because of new food safety concerns...which I can understand, however, none of us ever got sick on my old one and she got plenty of use, so I'm still bummed about it. So with this one, I have to watch it VERY carefully, and if I think I'm going to be gone all day long and something's in there that doesn't need a long cook time, I'll put it on the keep warm setting, which I'm convinced is the same setting as my old crockpot's low. I'm telling you, this new crockpot will be boiling on low and end up burning the edges. Drives me crazy. This time around I added a layer of cream cheese which got all melty and delicious and warm and really helped keep the casserole from being too dry. Of course, my hubs and boys still doused theirs with ketchup, but what can ya do? I used one bag of refrigerated Simply Potatoes shredded hashbrowns and they were perfect. They are buy one get one free at Publix frequently, so I usually stock up on those for soups, casseroles, breakfast, etc. Such a tasty and versatile product!

Saturday, June 8, 2013

Peanut Butter Chip Banana Bread


Makes 1 Loaf

3/4 cup butter, softened (12 tablespoons...1 1/2 sticks)
1 cup sugar
2 eggs
3 bananas, overripe and soft
3 tablespoons peanut butter
1 teaspoon vanilla
2 cups flour
1 teaspoon baking powder
1/2 teaspoon baking soda
1/2 teaspoon salt
1 cup unsalted peanuts, chopped
1 cup peanut butter chips

Directions:

Preheat oven to 350.

Cream butter and sugar together 2 minutes until pale yellow. Add in eggs, one at a time, beating well between; then beat 2-3 minutes until light and fluffy. Beat in bananas until incorporated well, then peanut butter and vanilla, mixing well until combined. Sift together the flour, baking powder, baking soda and salt and gently fold dry ingredients into wet ingredients a little at a time, mixing only until JUST combined. Gently stir in peanuts and peanut butter chips. Pour into well greased loaf pan and bake for 60 minutes in the center of the oven, on the center rack. *If you bake on the upper or lower racks instead of center, remember to rotate halfway through the bake time or you'll end up with overdone edges and/or bottom* Remove from oven and let cool in pan 10 minutes before running a butter knife along the edges and then tipping on a pan, flipping it over right side up until cooled; can serve warm or cold. 


One of our family's favorite things is a peanut butter and banana sandwich with a tall glass of cold milk. I made some banana bread earlier this week and had a couple bananas left so I decided to  try something new: peanut butter banana bread! And it turned out amazing. This will definitely be a regular in our household from now on! I only had two bananas so I used a teaspoon and a half of banana flavored extract also, but I definitely prefer to use three bananas rather than the extract. I could see this served with some peanut butter spread on top or warm from the oven with a pat of butter on it. Give it a try! It's yumm-o. 

Monday, May 27, 2013

Creamy Southern Cheese Grits


Makes 6-8 Servings

6 cups water
1 cup milk
1 cup heavy cream
(OR 2 cups half & half)
2-3 teaspoons salt
1/4-1/2 teaspoon pepper
2 cups grits
2 cups grated extra sharp cheddar cheese, white or yellow
2 tablespoons parmesan
4 tablespoons butter

Directions:

In a medium saucepan, combine water, milk and cream or half and half, 2 teaspoons of salt and 1/4 teaspoon black pepper. Bring to a boil over medium-high heat. Whisk constantly and watch closely, milk/cream can scorch and boil over VERY quickly! When liquid comes to a boil, slowly whisk in grits and reduce heat to medium-low, continuing to whisk frequently until thick and smooth, about 5-8 minutes. Stir in 1 cup of shredded cheese, whisking until melted and grits turn yellow. Stir in remaining cheddar and parmesan cheeses until melted, then stir in butter, stirring until melted. Taste and add remaining salt and pepper if desired.


This is our go-to grits recipe and it's pretty easy and basic--we always have these ingredients on hand. I frequently make these before church by themselves, or for Saturday brunch alongside eggs, bacon, sausage, etc. We like to do big breakfasts around here on the weekends. It's also a great base for shrimp and grits or my Fried Grit Cake and Tasso Cream Sauce . If I'm making it into the grit cake, I reduce the amount of cream and add a couple eggs before refrigerating it to let it get solid. We love grits 'round these parts! It's a Southern staple in this household.


Monday, May 20, 2013

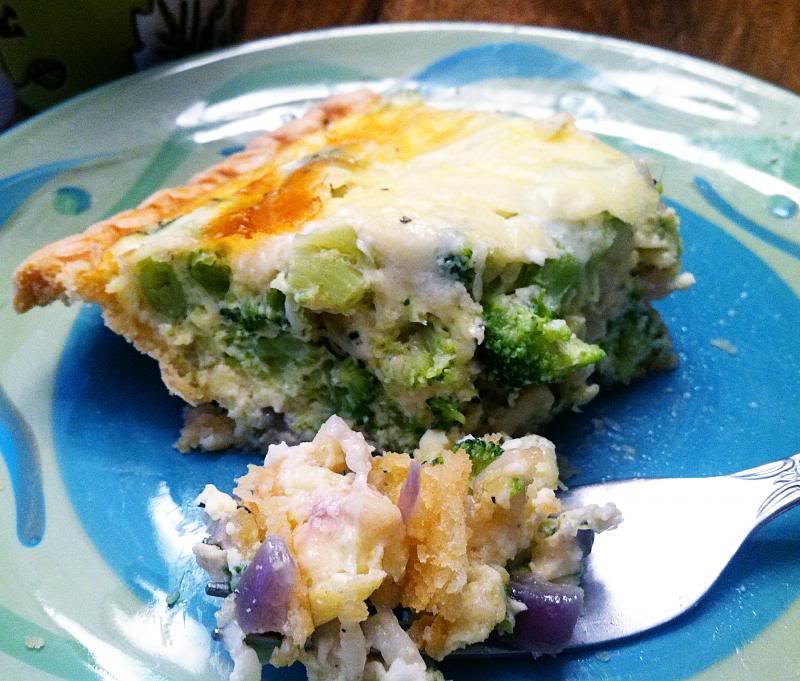
Bacon & Veggie Quiche


Makes 8 Servings

1 pound bacon, cooked and crumbled
2 tablespoons butter
1 whole large red onion, chopped
1 package frozen broccoli, cooked and chopped
3 green onions, chopped
1 pie crust dough round
7 eggs
1 1/2 cup heavy whipping cream
1 1/2 cups grated Swiss cheese
1 cup grated parmesan
Salt and pepper, to taste

Directions:

Preheat oven to 400

Melt butter in a small-medium skillet. Add onions and cook for 2 minutes, until slightly softened. Toss in broccoli and heat for a minute, tossing to coat. Salt and pepper mixture lightly to taste, keeping in mind you'll also season the egg mixture. Remove from heat and allow to cool for 15-20 minutes. Meanwhile, spread pie crust in a deep dish tart pan with removable bottom (a deep dish pie pan will work fine if you don't have a tart pan). In a large bowl, beat eggs with cream. Add cheeses, salt and pepper; set aside. Add veggie mixture and chopped bacon to eggs and stir until combined. Pour into pie crust and press with the back of a spoon to submerge ingredients. Cover loosely with foil and place on a baking sheet. Bake for 1 hour, removing foil for last 15 minutes to brown. Check middle of quiche, and if it looks too jiggly, bake for up to 10 minutes longer. Remove from oven and let sit for 10-15 minutes before serving. Remove bottom from pan and slice into wedges to serve.


Mmmm, quiche. One of my favorite things! The hubs and I like to make this for brunch a lot on weekdays where all four of the kiddos are at school and we want something yummy and substantial, but homemade. The kids like quiche also, so sometimes we make it on a weekend for a special treat, but then we have to make it without onions, so we like it better when we have it all to ourselves. YUM!

Thursday, June 9, 2011

Breakfast Pizza

Makes 1 Pizza

1 can regular Pillsbury pizza crust dough
6 strips pre-cooked bacon, chopped
1/2 cup parmesan
2 cups mozzarella
6 eggs
salt and pepper

Directions:

Preheat the oven to 425. 

Spray pizza pan if necessary--can use round or rectangle. Stretch dough to fit and sprinkle with parmesan, mozzarella and bacon. Crack eggs over the top and season with salt and pepper. Bake for 15-20 minutes or until eggs are set to desired amount.


EASIEST. BREAKFAST. EVER!!! You don't have to do any prep work--I bought pre-cooked bacon and used meat-cutting scissors to chop it right over the top of the pizza. Pop it in the oven and you're good to go. This was a HUGE hit with my kids...what kid doesn't like pizza?? We all loved it and it's become a pretty regular breakfast in this household. :)

Monday, October 6, 2008

Lemon Poppy Seed Muffins


Makes 12 Muffins

3 cups flour
1 stick butter, softened
1 cup sugar
2 eggs
1 1/2 cup plain yogurt
1/2 cup fresh lemon juice
2 teaspoons lemon zest
1 tablespoon baking powder
1/2 teaspoon baking soda
2 tablespoons poppy seeds
dash salt

Glaze:
2 tablespoons fresh lemon juice
1 cup powdered sugar

Directions:

Preheat oven to 375

Stir together flour, baking powder, baking soda, poppy seeds and salt and set aside. In a large mixing bowl, cream butter and sugar together, beating until fluffy (about 2 minutes with an electric mixer). Add eggs one at a time, beating well after each one. Beat in the lemon juice and zest. Beat in dry ingredients and yogurt, alternating 1/2 cups of each, just until incorporated. Grease or use paper-lined muffin tins and fill each cup 2/3 full. Bake 25-30 minutes until golden brown, checking with toothpick test. Remove to a platter and brush with glaze immediately. Glaze: Using a wire whisk, briskly whisk together the powdered sugar and the lemon juice. Drizzle on top of each muffin while still warm.


I love lemon poppy seed muffins and always used to just buy a mix until I tried making them from scratch one day. I fell in love and hardly ever use a box anymore! These are best right out of the oven with a little butter.

Friday, September 26, 2008

Overnight Breakfast Bake


Makes 6 Servings

1 cup baking mix (Bisquick, Jiffy, etc.)
1 1/2 cup shredded cheese
2 cups milk
1 teaspoon cayenne
1/2 teaspoon oregano
1/2 teaspoon parsley
1/2 teaspoon garlic powder
6 eggs, beaten
1lb. breakfast sausage, browned and drained


Directions:

Mix all ingredients in a large bowl, reserving 1/2 cup cheese for topping. Cover and refrigerate 8-24 hours, or overnight. Pour into a greased casserole dish and bake uncovered at 350 for 1 hour, or until a knife inserted in center comes out clean. Turn oven off. Sprinkle 1/2 cup shredded cheese over top of casserole and let sit in oven until melted.


This is my favorite breakfast to make on the weekends because it allows me to sleep in! A lot of the time I prepare it the night before along with dinner and just stick it in the fridge. Then the next morning when I wake up, I pop it in the oven. Sometimes I even put it in the oven and go back to bed for one more hour! Then we all wake up to a home-cooked breakfast without the mess and fuss.

Wednesday, September 24, 2008

Nelson's Veggie Omelettes


Makes 1 Omelet

2-3 eggs, beaten
1/4 cup each, chopped: green pepper, red onion, green onion, tomato, etc.
1/2 cup shredded cheddar cheese
2T butter
Salt
Pepper


Directions:

On medium heat, melt 1 tablespoon of butter. Saute veggies until crisp-tender, stirring occasionally. Remove sauteed veggies from skillet and put aside in small bowl. Wipe skillet clean of residue. Melt other 1 tablespoon of butter over medium heat and pour in beaten eggs, spreading around pan evenly. Cook to desired doneness. Sprinkle with salt and pepper. Add sauteed veggies and cheese along the center of the omelet. With a wide, flat spatula, flip right side of omelet over filling. Repeat, folding right side over again, allowing omelet to "mesh" and cheese to melt. Carefully use spatula to remove to plate, sprinkle with additional cheese or seasonings if desired and eat!


These omelettes are to die for. My poor husband gets nagged to make them for me all the time! We eat them at least once a week. We mix it up with different veggies, and/or meats, like 1/4 cup cubed ham or ground sausage, and different sides like toast or english muffins and sausage links or bacon. This is an extremely versatile dish because you can customize the filling and seasonings to anything you're in the mood for! We like to make a Mexican version with peppers, ham, sour cream and salsa. We have freshly brewed coffee with a few splashes of some flavored creamer and some good old Florida orange juice to top off this great breakfast. Delicious!

Saturday, June 23, 2007

Crockpot Breakfast Casserole


Makes 6-8 Servings

1 lb. ground pork sausage, browned & drained
1 28 oz. package frozen country-style hash browns, thawed
2 cups shredded sharp cheddar cheese
12 eggs, slightly beaten
1 cup milk
2 teaspoons salt
1 teaspoon pepper
1/2 teaspoon ground mustard

Directions:

Place hash browns in greased 6 quart crockpot. Spoon sausage over hash browns and sprinkle with cheese. Whisk together eggs, milk, salt, pepper and ground mustard and pour over cheese. Cover and cook on low 4 to 4 1/2 hours until set. Uncover and let stand 15 minutes.


My husband is going to love waking up to this in bed tomorrow morning as part of his pampering on Father's Day! This is one of our favorites. I usually prepare it all the night before and stick the crock dish in the fridge. Then I wake up around 4 or 5 in the morning and stick it in the heating unit and start it on the low setting. Then you wake up around 8 or 9 to the delicious smell of breakfast ready in the kitchen! Perfect for weekends, and great for company. No pressure to have it ready when your company wake up--now it's already there.