Friday, May 31, 2013

Strawberry Lemonade


Makes about 1 gallon

10 lemons
1 lb strawberries
1 1/2 - 2 cups sugar
1 cup water
+ additional water and ice

Directions:

Wash and slice strawberries, slicing the leaves and stems off the top. Place in a blender and blend for 2-3 minutes until pureed. Slice 8 lemons in half and juice them; you can squeeze the juice out using your hands or a citrus juicer. You will get about 1 1/3 to 1 1/2 cups of lemon juice. Place sugar and 1 cup of water in a glass measuring cup or bowl and microwave for about 5 minutes until sugar is dissolved and water is clear again. (You can do this on the stovetop if you prefer.) Whisk to dissolve any remaining particles. This will be your simple syrup. Pour strawberry puree through a mesh strainer into a 1 gallon pitcher, pressing with a spoon to get all the puree through--I also pour cups of water through towards the end when it gets thick and stubborn. Rinse the strainer and pour the lemon juice through it into the pitcher, again pressing with a spoon to get all the juice through. Pour simple syrup into the pitcher and stir well to combine. Add cold water and ice as needed to reach the top. Slice remaining 2 lemons and stir slices into the lemonade. Serve over ice. 


It's summertime!!! And that means lot of sweet tea and lemonade here in the south. This is one of our very favorite drinks and it really doesn't get any better than homemade strawberry lemonade straight from the strawberry patch and lemon tree. Of course running on down to Publix to pick up some strawberries and lemons is just fine too, which is what we did today. There's not much that's more refreshing that a tall, icy glass of homemade strawberry lemonade. And soon I'll be sipping mine from the new wood deck in my backyard that my husband is working on right this very minute. Can't wait! This is so easy and quick to put together! There's no reason to buy that expensive storebought stuff anymore when it's so cost-effective and easy to make your own, not to mention it's healthier too! I LOVE this, it's pretty and delicious, making this Southern girl one happy mama! Smiling faces are coming in right now from helping daddy in the yard to fill up their glasses with this treat. If you like yours more tart, juice another couple lemons and stir it in. Likewise if you prefer it sweeter, add another 1/2 cup of sugar to your water before boiling it into a simple syrup. Drink up!


Thursday, May 30, 2013

5 Layer Bars


Makes 32 bars

1/2 cup graham cracker crumbs
1/2 cup butter (1 stick)
1 14oz can sweetened condensed milk
1 cup semisweet chocolate chips
1 cup butterscotch chips
1 1/3 cup sweetened coconut flakes
1 cup chopped nuts (pecans, walnuts, almonds, peanuts or even a combo)

Directions:

Preheat oven to 350 for a metal pan; 325 for a glass pan.

Put butter in a 13x9 pan and place in hot oven for a few seconds to melt the butter. Sprinkle graham cracker crumbs evenly over the melted butter. Sprinkle with nuts, then coconut, then chips and pour condensed milk evenly over the top. Bake for 30 minutes. Let cool, cut into bars and serve.


One of my absolute favorite desserts and SO easy too. These taste similar to the famous Samoa cookie by the Girl Scouts. These are the type of bars you find yourself eating too many of! And the recipe is just so flexible, you can really make so many different types of bars by using this one as your base! Use chocolate cookie crumbs rather than graham. Try white chocolate chips and dark chocolate chips or milk chocolate and peanut butter chips. Experiment with different nuts or a combination of nuts. So many ways to make this, you could try a new one every day and not run out of ideas for weeks. So much fun and so much mmmmm!

Wednesday, May 29, 2013

Crockpot Calico Beans


Makes 4-6 Servings

2 lbs ground beef, browned and drained
1 lb bacon, cooked and crumbled, or 1 lb fully cooked bacon, cut up
1 large onion, chopped
1 large can baked beans
2 cans dark kidney beans, rinsed and drained
1 can butter beans, drained
1 can lima beans, drained
1/3 cup sugar
2/3 cup brown sugar
1/2 cup ketchup
1 tablespoon cider vinegar
1 tablespoon mustard

Directions:

Place all ingredients in a greased crockpot and stir together until combined well. Cook on low for 4-6 hours. Serve with cornbread and fresh chopped onion if desired.


This is one of our favorite, super easy, super quick, super filling recipes. I usually like to keep cooked ground beef in ziploc bags in my freezer, and I always have some of the fully-cooked packages of bacon on hand, so if I've forgotten to pull something out of the freezer for dinner and I look at the clock and it's 2pm already, I still have plenty of time to throw this together and still get dinner on the table at a reasonable hour. It tastes sweet like baked beans, and is delicious over cornbread. Sometimes we like to put some chopped green pepper in the crockpot too and you will want to taste it and add extras of the last five ingredients and/or some salt if you think it needs it. I do a lot of tasting and adding this or that...I will never serve something to my family (or friends or anyone for that matter) that I haven't tasted first! I am a HUGE fan of crockpot meals, especially in the summer when I don't want to heat up my whole kitchen for dinner.


Monday, May 27, 2013

Happy Memorial Day


Remember the reason why we are free to celebrate today and every day. Thank you to those who have served, past and present. Today we remember and honor those who gave their lives so that we could be free to live ours in this great country of the United States of America.


Creamy Southern Cheese Grits


Makes 6-8 Servings

6 cups water
1 cup milk
1 cup heavy cream
(OR 2 cups half & half)
2-3 teaspoons salt
1/4-1/2 teaspoon pepper
2 cups grits
2 cups grated extra sharp cheddar cheese, white or yellow
2 tablespoons parmesan
4 tablespoons butter

Directions:

In a medium saucepan, combine water, milk and cream or half and half, 2 teaspoons of salt and 1/4 teaspoon black pepper. Bring to a boil over medium-high heat. Whisk constantly and watch closely, milk/cream can scorch and boil over VERY quickly! When liquid comes to a boil, slowly whisk in grits and reduce heat to medium-low, continuing to whisk frequently until thick and smooth, about 5-8 minutes. Stir in 1 cup of shredded cheese, whisking until melted and grits turn yellow. Stir in remaining cheddar and parmesan cheeses until melted, then stir in butter, stirring until melted. Taste and add remaining salt and pepper if desired.


This is our go-to grits recipe and it's pretty easy and basic--we always have these ingredients on hand. I frequently make these before church by themselves, or for Saturday brunch alongside eggs, bacon, sausage, etc. We like to do big breakfasts around here on the weekends. It's also a great base for shrimp and grits or my Fried Grit Cake and Tasso Cream Sauce . If I'm making it into the grit cake, I reduce the amount of cream and add a couple eggs before refrigerating it to let it get solid. We love grits 'round these parts! It's a Southern staple in this household.


Friday, May 24, 2013

Kitchen Remodel


We recently remodeled our kitchen. We painted the cabinets & hardware, replace the counters, and did some shifting in layouts.
*Note: Click images for full-size view and you can use your arrow keys to scroll through all full-size photos!*

Before:


Awful, right? Eep! Just look at those organgey-cabinets...they blend in with the floor and create a whole lotta dark, orange icky feelings. So much clutter too! Yeesh...I can't believe we lived with it like this for nearly 8 years! 

And now for an after: 


MUUCH better!


And here's a new one from today since I've changed a couple minor pieces of artwork:


Here's a breakdown of what we did:


  • Shifted our refrigerator down and moved the odd little square of cabinet and counter down also, as well as the "bridge" cabinetry above the fridge. This got rid of a weird, neglected waste of space that just collected clutter and dust, and allowed us to have a bigger stretch of countertop space. Since we bought a French door fridge that had an in-door ice maker, being able to open that one door completely open wasn't as big of a deal, and there's still plenty of room for the door to open wide enough even being against the wall like that.


  • We also got rid of the weird lifted bar area that we hated, and created a wide, flat, open piece of countertop for the bar area. (We still need to paint our barstools and return those to their spot.) 


  • We purchased butcher block countertops from IKEA. We went with oak because they were out of birch, and turns out, we like oak the best after all. 


  • Stained butcher block with super strong coffee and treated it with tung oil. 


  • We painted our cabinets White Dove by Benjamin Moore and the hardware a hammered bronze by Rustoleum. 

I love my new kitchen, it is SO much brighter and even feels much bigger than it did before. I made my hubby's day by telling him it's my dream kitchen. :)


Thursday, May 23, 2013

Savory Meatloaf


Makes 8 Servings

3 lbs ground chuck
2 eggs
1 1/2 cups oatmeal
1/4 cup milk
1 medium green pepper, chopped
1 medium onion, finely diced
1 tablespoon onion powder
2 tablespoons garlic powder
1 tablespoon Italian seasoning
1 tablespoon Worcestershire
Olive oil

Topping:
1/2 cup ketchup
1 tablespoon mustard
1 tablespoon brown sugar
1 teaspoon soy sauce
1/2 teaspoon Worcestershire

Directions:

Preheat oven to 350.

Place all meatloaf ingredients in large bowl and mix with hands until well blended--do not over mix, just until well blended and "dough" is formed. Form into loaf, cut four slits in the top and drizzle with olive oil. Place on greased cookie sheet or loaf pan. Bake for 55-65 minutes. Meanwhile, mix all topping ingredients together until well blended. After meatloaf is done, pour off grease and spread topping evenly over the top of the meatloaf. Place back in oven for 8-10 minutes. Cut into slices and serve. *Can also preheat oven to 400, shape meatloaf into several 3" balls and place in a greased muffin tin. Bake for 15-20 minutes until done.*


Meatloaf is a favorite in this house! We usually eat ours with some type of potato--baked, mashed or hashbrown casserole are the top choices here. Also a roasted vegetable and yeast rolls usually find their way onto the table also. When I am in a rush, I do the muffins...so much faster! The kids like to get their own individual "meatballs". Just cut slits in each "muffin" and drizzle with olive oil, bake as directed and top with the spread either just before serving, or if you want it to "glaze", stick it back in the oven just as you would the loaf, for 8 minutes or so. I have so many variations of meatloaves and every time I serve one we all say "This is my favorite one!" because the truth is you just can't go wrong with any of them! I have an Italian version that I will be posting soon that is awesome also. One thing I love about meatloaf is the leftovers--slap some between a couple of slices of bread and you've got a yummy sandwich for lunch the next day. Mmmm!


Wednesday, May 22, 2013

Sausage Balls


Makes 50-60

1 lb ground sausage
2 3/4 cups baking mix
4 cups shredded sharp cheddar
Dash pepper
Dip:
1 cup mayonnaise
1 1/2 tablespoons mustard

Directions:

Preheat oven 375

In large bowl, combine baking mix, raw sausage, shredded sharp cheddar (freshly shredded works best!) and pepper until well blended and dough is formed. Shape into 1" balls and place on parchment lined baking sheet about an inch apart. Bake for 18-20 minutes until golden brown. Mix mayo and mustard together in a small bowl and serve as dip with the sausage balls. 


This is one of my favorite appetizers for any occasion! We absolutely always have them on New Year's Eve, as long as I can remember, even as a little girl, my mom would make these for that holiday. I also make them for parties, football games, or even afternoon snacks for the kids and I since they love them as much as I do. So easy to make and amazing with the dip as well, don't leave it out, even if you don't like mustard, you can definitely add less mustard if you like it less "mustardy" but this is the perfect balance for us and it's just delish.


Tuesday, May 21, 2013

French Silk Chocolate Pie


Makes 8 Servings

1 baked pie shell
1/2 cup butter
3/4 cup sugar
2 1 oz squares unsweetened baking chocolate, melted and cooled
1 teaspoon vanilla
2 eggs
Whipped cream
Chocolate, chopped, shaved or curled

Directions:

Cream butter, gradually adding sugar, until light and fluffy. Blend in melted chocolate and vanilla. Add eggs, 1 at a time, beating 5 minutes after each. Turn into a baked pie crust and chill until firm, 2-3 hours. Garnish with whipped cream and chocolate curls or shavings. Cut into 8 wedges and serve.


Absolutely, positively one of my all-time favorite desserts! We have this at Christmas and at Easter and any other time we are craving it! My mom has been making it for years and the combination of salty, flaky pie crust with semisweet, creamy chocolate is TO DIE FOR. I love, love, love this pie!

Monday, May 20, 2013

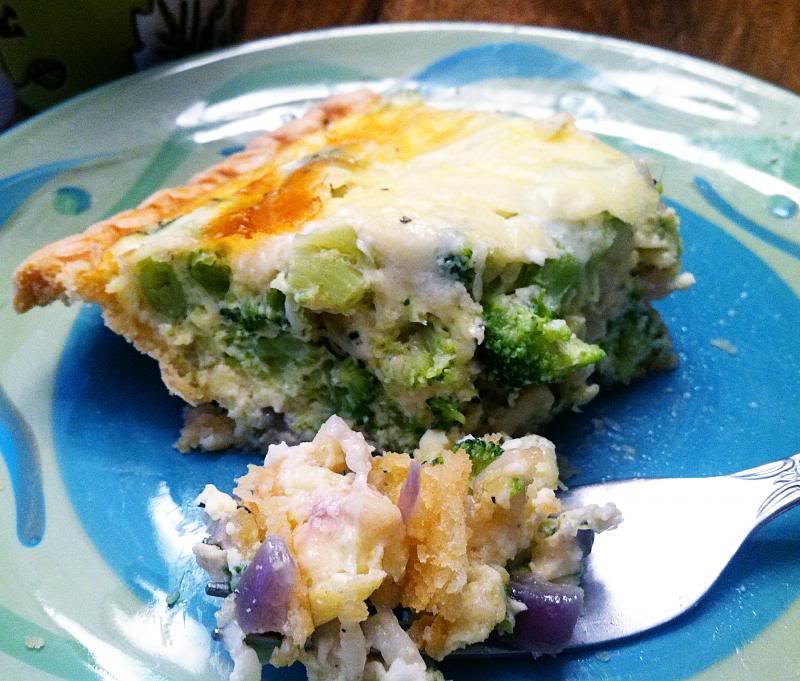
Bacon & Veggie Quiche


Makes 8 Servings

1 pound bacon, cooked and crumbled
2 tablespoons butter
1 whole large red onion, chopped
1 package frozen broccoli, cooked and chopped
3 green onions, chopped
1 pie crust dough round
7 eggs
1 1/2 cup heavy whipping cream
1 1/2 cups grated Swiss cheese
1 cup grated parmesan
Salt and pepper, to taste

Directions:

Preheat oven to 400

Melt butter in a small-medium skillet. Add onions and cook for 2 minutes, until slightly softened. Toss in broccoli and heat for a minute, tossing to coat. Salt and pepper mixture lightly to taste, keeping in mind you'll also season the egg mixture. Remove from heat and allow to cool for 15-20 minutes. Meanwhile, spread pie crust in a deep dish tart pan with removable bottom (a deep dish pie pan will work fine if you don't have a tart pan). In a large bowl, beat eggs with cream. Add cheeses, salt and pepper; set aside. Add veggie mixture and chopped bacon to eggs and stir until combined. Pour into pie crust and press with the back of a spoon to submerge ingredients. Cover loosely with foil and place on a baking sheet. Bake for 1 hour, removing foil for last 15 minutes to brown. Check middle of quiche, and if it looks too jiggly, bake for up to 10 minutes longer. Remove from oven and let sit for 10-15 minutes before serving. Remove bottom from pan and slice into wedges to serve.


Mmmm, quiche. One of my favorite things! The hubs and I like to make this for brunch a lot on weekdays where all four of the kiddos are at school and we want something yummy and substantial, but homemade. The kids like quiche also, so sometimes we make it on a weekend for a special treat, but then we have to make it without onions, so we like it better when we have it all to ourselves. YUM!

Sunday, May 19, 2013

Fresh Fruit Pavlova


Makes 24 Servings

Ingredients:

2 teaspoons cornstarch
2 teaspoons white vinegar
6 egg whites
1 3/4 cup sugar
2 tablespoons vegetable shortening
4 tablespoons sugar
2 cups heavy whipping cream
2 teaspoons vanilla
2-3 kiwis, sliced
1 pint strawberries, washed, dried and sliced
1 pint blueberries, washed and dried


Directions:

Preheat oven to 275

Mix together cornstarch and vinegar in a small bowl until combined. In mixer, beat egg whites with wire whisk attachment on high until stiff peaks are formed. Stir in cornstarch and vinegar combination on low. Beat in sugar until thoroughly combined. Cover a cookie sheet or jelly roll pan with wax paper. Spread shortening on wax paper, coating evenly and thoroughly. Pour mixture evenly over wax paper and spread with an offset spatula until even, or you can form peaks if you like. Bake at 275 for 1 hour. Turn off the oven and let sit until cool. Meanwhile, whip the whipping cream in the mixer with a wire whisk until stiff peaks form. Beat in sugar until combined; gently stir in vanilla. Spread evenly over cooled pavlova and sprinkle fruit over the top, covering evenly. Cut into wedges and serve.


Pavlova is one of our favorite summertime desserts. It is light and fresh and so delicious and the sweetness is balanced with the fresh fruit and cream. Named after a famous ballerina, Anna Pavlova, you could eat this for any occasion, or even as a midday snack. My husband has requested this as a birthday cake before, and we've had it at many family get-togethers. It's a popular one for Fourth of July also, as we'll cut out the kiwi and do an American flag design on the top with the strawberries and blueberries instead.

Saturday, May 18, 2013

Crockpot Chicken & Dumplings


Ingredients:

4-6 boneless skinless chicken breasts & thighs
2 tablespoons butter
2 cans cream of chicken soup
1 can chicken broth
1 medium onion diced
1 tablespoon dried parsley
1 10oz can refrigerated biscuits, cut into quarters
2 cups frozen peas, thawed

Directions:

Spray crockpot with nonstick cooking spray. Place chicken in bottom of crockpot. Place butter over chicken. Pour cream of chicken soup and broth in. Sprinkle onion and parsley. Cook on high 4-6 hours until chicken is cooked through and sauce is boiling. Place biscuit dough on top and cook for 1 hour more until biscuits are cooked through. Serve.


My family loves this easy crockpot meal and we have it at least once or twice a month. I usually put frozen chicken in and a couple chicken bouillon cubes instead of the broth since the frozen chicken creates its own water. I also use my homemade cream of chicken soup mix instead of the canned stuff.


Cherry Almond Cake


Cake:
1 box white cake mix
1 cup flour
1 cup sugar
3 eggs
1 tablespoon almond extract
1 cup sour cream
3/4 cup maraschino cherries, chopped
4 tablespoons cherry syrup, from jar of cherries

Frosting:
10 tablespoons flour
3/4 cup milk
1/4 cup half & half
2 teaspoons vanilla
4 sticks of butter, softened
2 cups sugar

Filling:
2 cups frosting (above)
1/2 cup maraschino cherries, chopped
1-2 tablespoons cherry syrup

Directions:

Preheat oven to 325.

Cake:
Cut circles of parchment paper to fit in three 8" round cake pans. Spray pans before placing paper and again after paper. In a mixer, combine cake mix, flour, sugar and salt. Using the whisk attachment, stir on low until combined. Add eggs, sour cream, water, almond extract and cherry syrup. (What I do is get a cup of warm water in a pyrex measuring pitcher and add the eggs to the water and let them sit while adding the rest of the ingredients, this way the eggs reach room temperature quickly.) Beat on low speed for 30 seconds to combine, then increase speed to medium and mix for 2 minutes, scraping down the bowl as needed. Add in chopped cherries and stir to combine. Pour the batter evenly into all three pans and bake for 30 minutes, checking with a toothpick. Can bake an additional 3-5 minutes if needed. Cool in pans 10 minutes, then transfer to a wire rack until completely cool.
Frosting & Filling:
In small-medium saucepan over medium-high heat, combine milk, half and half and flour, whisking constantly until thickened, this takes about 5-8 minutes. Make sure you whisk constantly to avoid scorching. Remove from heat and allow to cool completely--I usually put my saucepan in the fridge on a heating pad about 10 minutes or so and this cools it quickly. Meanwhile, beat the butter and sugar in your mixer until light and fluffy, about 5 minutes. Once the flour mixture has cooled, whisk in the vanilla until combined and pour into the butter and sugar mixture. Turn the mixture to medium and beat until light and fluffy, about 5 minutes. Take 2 cups of the frosting and put in another bowl and mix the chopped cherries & cherry juice into it; this will be your filling.
Assembly:
Place your first cake layer on your cake stand or plate or whatever you will use to serve and spread half of the filling on that layer, using an offset spatula to spread evenly to the edges. Repeat for second layer. Place third layer on top and put about 2/3 of the frosting from the mixer bowl on top and spread evenly with your offset spatula to cover as well as possible, creating a crumb layer of frosting. Refrigerate the entire cake for 20-30 minutes. Remove from fridge and frost with remaining frosting, spreading evenly to cover any thin or bare spots. Dip offset spatula in warm water to smooth out the frosting, repeating until you reach the desired look. You can now accent with decorating tips or additional cherries as desired.


This cake is absolutely just as delicious as it is pretty. My husband requested it for his birthday and immediately proclaimed it the best cake he's ever had. I recommend having 2-3 large jars of maraschino cherries on hand as you will go through them a lot quicker than you think! I was hoping to have some to top the cake with, but I ran out of cherries and only had the syrup left so instead I flavored the filling with a bit of extra syrup since I was short on cherries. It seems like a lot of directions, but it's actually really easy to make compared to a lot of others I've done, and quicker also. One of my cake pans was MIA so I used a foil one, which led to a smaller top layer, but I just filled it in with frosting to make it even--you can see this in the photo, the top layer has a thicker outer coat of frosting than the other two. Also the middle layer got more brown on the bottom than I would've liked, so next time I will rotate the cake pans a little more than halfway as opposed to right at halfway through the baking time. This cake will definitely be a regular in our house, it was a hit in our family and everyone got up this morning wanting it for breakfast!

*Adapted from www.lemon-sugar.com*